Showing posts with label google app engine. Show all posts
Showing posts with label google app engine. Show all posts
Sunday, April 19, 2009
Interesting article about Google App Engine
Here is a very nice article by Dion Hinchcliffe. In this post, Dion summarizes the offerings and the missing pieces of GAE. If you are interested in cloud computing, specially GAE it is worth reading.

Friday, April 10, 2009
Java support for Google App Engine
On the morning of april 7, 2009, Google announced Java support for App Engine. There is a catch, only a list of core Java classes are supported so there is bound to be a debate about it.
I was very excited to hear this news. Google restricted access to the first 10,000 developers who sign up. I wanted to test drive it so I signed up for an account on 7th evening. I was actually surprised to get my account approved the next day. I thought I was late in signing up but looks like I was not.
I downloaded the AppEngine Java SDK and the Google plugin for Eclipse on my Windows laptop. I am a heavy Eclipse user, so was very happy to see the plugin. I followed the directions for installation and setup. It was pretty straightforward unlike some problems I ran into with the Python App Engine installation and setup on Mac last time. I wanted to do it on my mac but it was indisposed at that time. I went ahead and created a project with a simple servlet as per the instructions, uploaded it to my account and everything worked like a charm.
Google also has a running list of frameworks, lanaguages and libraries which will run on the App Engine. Lot of JVM based languages like Jython, Groovy etc are supported. So now a wider community will embrace Google App Engine.
I was very excited to hear this news. Google restricted access to the first 10,000 developers who sign up. I wanted to test drive it so I signed up for an account on 7th evening. I was actually surprised to get my account approved the next day. I thought I was late in signing up but looks like I was not.
I downloaded the AppEngine Java SDK and the Google plugin for Eclipse on my Windows laptop. I am a heavy Eclipse user, so was very happy to see the plugin. I followed the directions for installation and setup. It was pretty straightforward unlike some problems I ran into with the Python App Engine installation and setup on Mac last time. I wanted to do it on my mac but it was indisposed at that time. I went ahead and created a project with a simple servlet as per the instructions, uploaded it to my account and everything worked like a charm.
Google also has a running list of frameworks, lanaguages and libraries which will run on the App Engine. Lot of JVM based languages like Jython, Groovy etc are supported. So now a wider community will embrace Google App Engine.
Wednesday, March 25, 2009
Getting started with google app engine
Its pretty straight forward to create an application on Google App Engine. I am briefly listing the steps involved in creating and deploying applications along with some mistakes that one could potentially make.
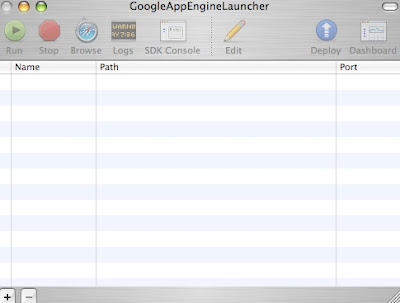
1. After you download the SDK (I used a Mac), start the GoogleAppEngine Launcher. This opens up a nice UI which I henceforth refer to as 'Launcher UI'
NOTE: When the launcher comes up, allow it to create symlinks. Basically this creates links for some very useful scripts (like appcfg.py , dev_appserver.py etc) in /usr/local/bin. This is very important if you plan to use the appcfg.py or the dev_appserver.py scripts from command line instead of using the Launcher UI. if you do not create the symlinks, when you run the appcfg.py script using the full path to it, the script may terminate with errors like "......ImportError: import google not found....."
Launcher UI
2. Log in to the google app engine website and register an application.
3. Follow the steps 'Creating Simple Request Handler' and 'Creating the Configuration File' listed here.
NOTE: the 'application' label in app.xml should be same as the Application Identifier you use when you create an application. If they are not, when you deploy the application on the app engine you will get errors like:
appcfg.py:1235 An unexpected error occurred. Aborting.
Traceback (most recent call last):
File "/Users/annika/Desktop/GoogleAppEngineLauncher.app/Contents/Resources/GoogleAppEngine-default.bundle/Contents/Resources/google_appengine/google/appengine/tools/appcfg.py", line 1213, in DoUpload...........
raise HTTPError(req.get_full_url(), code, msg, hdrs, fp)HTTPError: HTTP Error 403: Forbidden
<...snip...>
4. Test the application using the script dev_appserver.py as listed in the above website under the section 'Testing the application' or you can use the Launcher UI. In the Launcher UI, use the File -> 'Add Existing Application' since you have already created the application in step 3. Clicking the run button will run it on the default app server on your local host. Clicking the browse button will launch the browser and you can view your application on your local host. Clicking the stop button will stop the app server.
NOTE: In the launcher UI if you choose File -> 'New Application', and provide it the directory of your existing application, it will create a brand new application directory within your existing application directory. It will automatically create default app.yaml and .py file in the new directory. This will be the application that will be deployed and not your existing application.
5. Upload the application using the appcfg.py script as listed here or click the deploy button on the launcher UI.
6. You can modify the application by editing the .py file and can give it a different version in app.yaml file. Then you can redeploy the app using step 5.
NOTE:If the version in app.yaml is different from the original version(which is considered default), and you wish to make the newly uploaded file the default version for your application, go to your application dashboard in the app engine website, click on versions and make the newly uploaded file your default version, otherwise you will not see the changes. Remember only the default version shows up as the application in the website.
1. After you download the SDK (I used a Mac), start the GoogleAppEngine Launcher. This opens up a nice UI which I henceforth refer to as 'Launcher UI'
NOTE: When the launcher comes up, allow it to create symlinks. Basically this creates links for some very useful scripts (like appcfg.py , dev_appserver.py etc) in /usr/local/bin. This is very important if you plan to use the appcfg.py or the dev_appserver.py scripts from command line instead of using the Launcher UI. if you do not create the symlinks, when you run the appcfg.py script using the full path to it, the script may terminate with errors like "
Launcher UI

2. Log in to the google app engine website and register an application.
3. Follow the steps 'Creating Simple Request Handler' and 'Creating the Configuration File' listed here.
NOTE: the 'application' label in app.xml should be same as the Application Identifier you use when you create an application. If they are not, when you deploy the application on the app engine you will get errors like:
appcfg.py:1235 An unexpected error occurred. Aborting.
Traceback (most recent call last):
File "/Users/annika/Desktop/GoogleAppEngineLauncher.app/Contents/Resources/GoogleAppEngine-default.bundle/Contents/Resources/google_appengine/google/appengine/tools/appcfg.py", line 1213, in DoUpload.......
raise HTTPError(req.get_full_url(), code, msg, hdrs, fp)HTTPError: HTTP Error 403: Forbidden
<...snip...>
4. Test the application using the script dev_appserver.py as listed in the above website under the section 'Testing the application' or you can use the Launcher UI. In the Launcher UI, use the File -> 'Add Existing Application' since you have already created the application in step 3. Clicking the run button will run it on the default app server on your local host. Clicking the browse button will launch the browser and you can view your application on your local host. Clicking the stop button will stop the app server.
NOTE: In the launcher UI if you choose File -> 'New Application', and provide it the directory of your existing application, it will create a brand new application directory within your existing application directory. It will automatically create default app.yaml and .py file in the new directory. This will be the application that will be deployed and not your existing application.
5. Upload the application using the appcfg.py script as listed here or click the deploy button on the launcher UI.
6. You can modify the application by editing the .py file and can give it a different version in app.yaml file. Then you can redeploy the app using step 5.
NOTE:If the version in app.yaml is different from the original version(which is considered default), and you wish to make the newly uploaded file the default version for your application, go to your application dashboard in the app engine website, click on versions and make the newly uploaded file your default version, otherwise you will not see the changes. Remember only the default version shows up as the application in the website.
Subscribe to:
Posts (Atom)