I recently listened to a very interesting podcast on the future of Java Web development by Tim Bray who is the Director of Web Technologies at Sun. Tim Bray talks about cloud computing, concurrency challenges, running dynamic languages like Jython on JVM, REST and other emerging Web technologies.
I think it is a nice podcast and if you are interested in these technologies, you might find the talk interesting too.
Friday, April 3, 2009

Tuesday, March 31, 2009
Using Java I/O API to read and write integers as bytes to a binary file
Java I/O API is very vast. I have shown how to use BufferedInputStream and BufferedOutput stream to read and write integers as bytes to a file.My test case only involves 5 integers but the program is meant for a large number of integers.
BufferedInputStream:
My input stream is binary and not character. So I have used the stream type BufferedInputStream. I have wrapped the plain FieInputStream with the BufferedInputStream so that the input can be buffered. Then I have used the following method int read(byte[] b,int off,int len) to read up to len bytes of data from the stream into an array of bytes, thereby, improving performance.
BufferedOutputStream:
I have used the BufferedOutputStream to write all the bytes at once instead of using the plain FileOutputStream.
Efficient way to read integers from a file of bytes
Efficient way to write integers as bytes to a file
Test It
Here is the output:
Writing to File
931158145
189423544
641759623
-1731070039
1477642147
Reading from File
931158145
189423544
641759623
-1731070039
1477642147
BufferedInputStream:
My input stream is binary and not character. So I have used the stream type BufferedInputStream. I have wrapped the plain FieInputStream with the BufferedInputStream so that the input can be buffered. Then I have used the following method int read(byte[] b,int off,int len) to read up to len bytes of data from the stream into an array of bytes, thereby, improving performance.
BufferedOutputStream:
I have used the BufferedOutputStream to write all the bytes at once instead of using the plain FileOutputStream.
Efficient way to read integers from a file of bytes
import java.io.*;

public class ReadFile {

 private static final int numOfBytesInInt = 4;

    /**
     * This method reads bytes from a file and converts them to integers.
     * @param name filename
     * @param numOfBytes Number of bytes to read
     * @return Integer array
     */
 public static int[] getIntegersStoredAsBytesFromFile(String name, int numOfBytes) throws IOException {
  byte[] b  = readBytesFromFile(name,numOfBytes);
  return convertBytesToInteger(b);
 }

    /**
     * This method actually reads bytes from a file in one shot(hopefully).
     * It is more efficient than reading 1 integer or byte at a time in a file.
     * @param name filename
     * @param numOfBytes Number of bytes to read
     */
 public static byte[] readBytesFromFile(String name, int numOfBytes) throws IOException {
  BufferedInputStream bis = null;
  byte[] b = new byte[numOfBytes];
  try {
   bis = new BufferedInputStream(new FileInputStream(name));
   bis.read(b);
   return b;
  } finally {
   bis.close();
  }
 }

    /**
     * This helper method actually converts each 4 bytes into an integer.
     * There is also another way of doing it through bit manipulation.
     * @param b The byte array to convert to int
     * @return The array of ints
     */
 public static int[] convertBytesToInteger(byte[] b) throws IOException{
  ByteArrayInputStream bai = new ByteArrayInputStream(b);
  DataInputStream dis = new DataInputStream(bai);
  int len = b.length;
  int[] ints = new int[len/numOfBytesInInt]; //4 bytes = 1 int
  for (int i = 0,j = 0; i < len; i += numOfBytesInInt, j++) {
   ints[j] = dis.readInt();
  }
  return ints;
 }

}
Efficient way to write integers as bytes to a file
import java.io.*;
import java.util.Random;

public class WriteFile {

 private static final int numOfBytesInInt = 4;

    /**
     * This method generates integers using random number
     * generator, converts each integer to 4 bytes and
     * writes it to a file
     * @param name filename
     * @param numOfBytes Number of bytes to write
     */
 public static void generateIntegersAndStoreInFileAsBytes(
    String name, int numOfBytes) throws IOException {
  //Generate a byte[] of integers
  byte[] b = generateIntegersAsBytes(numOfBytes);
  //Write them to the file
  writeBytesToFile(name,b);
 }

    /**
     * This helper method actually generates the integers
     * using random number generator and converts
     * each integer to 4 bytes
     * @param numOfBytes Number of bytes to generate
     * @return Array of bytes
     */
 public static byte[] generateIntegersAsBytes(int numOfBytes) throws IOException {
  byte[] b = new byte[numOfBytes];
  int randomNumber = 0;
  Random r = new Random();
  for (int offset = 0; offset < b.length; offset += numOfBytesInInt) {
   //Generate random int
   randomNumber = r.nextInt();
   //Just have it here to show what is written into the file
   //is what we are reading later..
   System.out.println(randomNumber);
   //convert int to bytes
   intToByte(randomNumber, b, offset);
  }
  return b;
 }

    /**
     * This method writes all the bytes to a file in a one shot(hopefully without blocking).
     * It is more efficient than writing 1 integer at a time in a file.
     * @param name filename
     * @param b Array of bytes to write
     */
 public static void writeBytesToFile(String name, byte[] b) throws IOException{
  BufferedOutputStream bos = null;
  try {
   bos = new BufferedOutputStream(new FileOutputStream(name));
   bos.write(b);
   bos.flush();
  } finally {
   bos.close();
  }
 }

    /**
     * This helper method actually converts each integer to 4 bytes.
     * See the next method for another way to do the same thing.
     * @param integer Integer to be converted to bytes
     * @param b The byte array into which the bytes have to be stored
     * @param offset The start offset in b
     */
 public static void intToByte(int integer, byte[] b, int offset) throws IOException {
       ByteArrayOutputStream bos = new ByteArrayOutputStream();
       DataOutputStream dos = new DataOutputStream(bos);
       dos.writeInt(integer);
       dos.flush();
       System.arraycopy(bos.toByteArray(), 0, b, offset, numOfBytesInInt);
 }


 /* Instead of using the intToByte method, one could also manually convert
  * the integer to an array of bytes using bit arithmetic.
  * Here is a way to do it. To use this method, just replace the call
  * to the method intToByte() with generateByte() above
  *
  * private static void generateByte(int integer, byte[] b, int offset) {
  b[offset]=(byte)((integer & 0xff000000)>>>24);
  b[offset+1]=(byte)((integer & 0x00ff0000)>>>16);
  b[offset+2]=(byte)((integer & 0x0000ff00)>>>8);
  b[offset+3]=(byte)((integer & 0x000000ff));
 }*/

}
Test It
import java.io.*;
import static java.lang.System.out;

public class TestingFiles {

 private static final String filename = "INPUTBYTES";

 /*
  * I am just testing with 5 integers but you can practically
  * use any number which is a multiple of 4.
  */
 private static final int numOfBytes = 20;

 public static void main(String[] args) throws IOException{
  out.println("Writing to File");
  WriteFile.generateIntegersAndStoreInFileAsBytes(filename,numOfBytes);
  out.println("Reading from File");
  int[] ints = ReadFile.getIntegersStoredAsBytesFromFile(filename,numOfBytes);
  for (int i: ints) {
   out.println(i);
  }
 }


}
Here is the output:
Writing to File
931158145
189423544
641759623
-1731070039
1477642147
Reading from File
931158145
189423544
641759623
-1731070039
1477642147
Wednesday, March 25, 2009
Getting started with google app engine
Its pretty straight forward to create an application on Google App Engine. I am briefly listing the steps involved in creating and deploying applications along with some mistakes that one could potentially make.
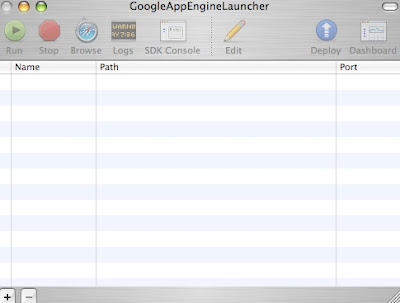
1. After you download the SDK (I used a Mac), start the GoogleAppEngine Launcher. This opens up a nice UI which I henceforth refer to as 'Launcher UI'
NOTE: When the launcher comes up, allow it to create symlinks. Basically this creates links for some very useful scripts (like appcfg.py , dev_appserver.py etc) in /usr/local/bin. This is very important if you plan to use the appcfg.py or the dev_appserver.py scripts from command line instead of using the Launcher UI. if you do not create the symlinks, when you run the appcfg.py script using the full path to it, the script may terminate with errors like "......ImportError: import google not found....."
Launcher UI
2. Log in to the google app engine website and register an application.
3. Follow the steps 'Creating Simple Request Handler' and 'Creating the Configuration File' listed here.
NOTE: the 'application' label in app.xml should be same as the Application Identifier you use when you create an application. If they are not, when you deploy the application on the app engine you will get errors like:
appcfg.py:1235 An unexpected error occurred. Aborting.
Traceback (most recent call last):
File "/Users/annika/Desktop/GoogleAppEngineLauncher.app/Contents/Resources/GoogleAppEngine-default.bundle/Contents/Resources/google_appengine/google/appengine/tools/appcfg.py", line 1213, in DoUpload...........
raise HTTPError(req.get_full_url(), code, msg, hdrs, fp)HTTPError: HTTP Error 403: Forbidden
<...snip...>
4. Test the application using the script dev_appserver.py as listed in the above website under the section 'Testing the application' or you can use the Launcher UI. In the Launcher UI, use the File -> 'Add Existing Application' since you have already created the application in step 3. Clicking the run button will run it on the default app server on your local host. Clicking the browse button will launch the browser and you can view your application on your local host. Clicking the stop button will stop the app server.
NOTE: In the launcher UI if you choose File -> 'New Application', and provide it the directory of your existing application, it will create a brand new application directory within your existing application directory. It will automatically create default app.yaml and .py file in the new directory. This will be the application that will be deployed and not your existing application.
5. Upload the application using the appcfg.py script as listed here or click the deploy button on the launcher UI.
6. You can modify the application by editing the .py file and can give it a different version in app.yaml file. Then you can redeploy the app using step 5.
NOTE:If the version in app.yaml is different from the original version(which is considered default), and you wish to make the newly uploaded file the default version for your application, go to your application dashboard in the app engine website, click on versions and make the newly uploaded file your default version, otherwise you will not see the changes. Remember only the default version shows up as the application in the website.
1. After you download the SDK (I used a Mac), start the GoogleAppEngine Launcher. This opens up a nice UI which I henceforth refer to as 'Launcher UI'
NOTE: When the launcher comes up, allow it to create symlinks. Basically this creates links for some very useful scripts (like appcfg.py , dev_appserver.py etc) in /usr/local/bin. This is very important if you plan to use the appcfg.py or the dev_appserver.py scripts from command line instead of using the Launcher UI. if you do not create the symlinks, when you run the appcfg.py script using the full path to it, the script may terminate with errors like "
Launcher UI

2. Log in to the google app engine website and register an application.
3. Follow the steps 'Creating Simple Request Handler' and 'Creating the Configuration File' listed here.
NOTE: the 'application' label in app.xml should be same as the Application Identifier you use when you create an application. If they are not, when you deploy the application on the app engine you will get errors like:
appcfg.py:1235 An unexpected error occurred. Aborting.
Traceback (most recent call last):
File "/Users/annika/Desktop/GoogleAppEngineLauncher.app/Contents/Resources/GoogleAppEngine-default.bundle/Contents/Resources/google_appengine/google/appengine/tools/appcfg.py", line 1213, in DoUpload.......
raise HTTPError(req.get_full_url(), code, msg, hdrs, fp)HTTPError: HTTP Error 403: Forbidden
<...snip...>
4. Test the application using the script dev_appserver.py as listed in the above website under the section 'Testing the application' or you can use the Launcher UI. In the Launcher UI, use the File -> 'Add Existing Application' since you have already created the application in step 3. Clicking the run button will run it on the default app server on your local host. Clicking the browse button will launch the browser and you can view your application on your local host. Clicking the stop button will stop the app server.
NOTE: In the launcher UI if you choose File -> 'New Application', and provide it the directory of your existing application, it will create a brand new application directory within your existing application directory. It will automatically create default app.yaml and .py file in the new directory. This will be the application that will be deployed and not your existing application.
5. Upload the application using the appcfg.py script as listed here or click the deploy button on the launcher UI.
6. You can modify the application by editing the .py file and can give it a different version in app.yaml file. Then you can redeploy the app using step 5.
NOTE:If the version in app.yaml is different from the original version(which is considered default), and you wish to make the newly uploaded file the default version for your application, go to your application dashboard in the app engine website, click on versions and make the newly uploaded file your default version, otherwise you will not see the changes. Remember only the default version shows up as the application in the website.
Monday, March 23, 2009
Simple RMI example
Here is a very simple RMI example. The writeup about RMI can be found in my previous post here.
Remote Interface
Implementation of the Remote Interface:
The Server
The client
Remote Interface
import java.rmi.Remote;
import java.rmi.RemoteException;

public interface Product extends Remote{

 public String getDescription() throws RemoteException;

}
Implementation of the Remote Interface:
import java.rmi.server.*;
import java.rmi.*;
import working.testing.myrmi.remoteinterface.*;

public class ProductImpl implements Product {

 private String type;

 public ProductImpl(String type)throws RemoteException{
  this.type = type;
 }

 public String getDescription() throws RemoteException{
  return ("The Product is " + type);
 }
}
The Server
import java.rmi.*;
import java.rmi.server.*;
import java.rmi.registry.*;
import working.testing.myrmi.remoteinterface.*;

public class MyRMIServer {

 public static void main(String[] args) {
  String toaster = "toaster";
  try {
   /** If an RMI program does not install a
    *  security manager, RMI will not download
    *  classes (other than from the local class path)
    *  for objects received as arguments or
    *  return values of remote method invocations.
    */
   if (System.getSecurityManager() == null) {
       System.setSecurityManager
        (new RMISecurityManager());
   }
   Product product = new ProductImpl(toaster);
   /**
    * Since the server dosent extend
    * UnicastRemoteObject,
    * First we need to export the
    * object. Once the remote object has been
    * successfully exported it is ready for
    * invocations. However for clients to
    * invoke the remote object, it needs to
    * be bound to the registry with a name.
    * If extending UnicastRemoteObject,
    * We should do only the following
    * Naming.rebind(toaster,product);
    * because it automatically exports
    * the remote object for us
    */
   Product stub = (Product)UnicastRemoteObject.
      exportObject(product,0);
   Registry registry = LocateRegistry.createRegistry(5555);
   registry.rebind(toaster,stub);
   System.out.println("Waiting for clients");
  } catch (Exception e) {
   System.out.println("The Exception is " + e);
   e.printStackTrace();
  }

 }

}
The client
import working.testing.myrmi.remoteinterface.*;
import java.rmi.*;
import java.rmi.registry.*;

public class MyRMIClient {

 public static void main(String[] args) {
  try {
   /** If an RMI program does not install a
    *  security manager, RMI will not download
    *  classes (other than from the local class path)
    *  for objects received as arguments or
    *  return values of remote method invocations.
    */
   if (System.getSecurityManager() == null) {
       System.setSecurityManager
        (new RMISecurityManager());
   }

   /**
    * First we need to get a handle
    * to the registry on the server machine and
    * then we need to lookup for the remote
    * object
    * We can also do
    * Product product =
    * (Product)Naming.lookup
    * ("rmi://host:1099/toaster");
    * where host is the hostname where
    * the server is running.
    * host will be localhost if the server is
    * running locally. Sometimes putting in
    * localhost can cause
    * some unnecessary exceptions, so just do
    * lookup("rmi://:1099/toaster") if
    * on localhost
    * Also while getting registry if on localhost
    * better to do just getRegistry() instead of
    * getRegistry("localhost") to avoid similar
    * exceptions as above.
    */
   Registry registry = LocateRegistry.
      getRegistry(5555);
   Product product = (Product)registry.
       lookup("toaster");
   /*Product product = (Product)Naming.
     lookup("rmi://:1099/toaster");*/
   System.out.println(product.getDescription());
  } catch (Exception e) {
   System.out.println("The exception is " + e);
   e.printStackTrace();
  }
 }
}
Subscribe to:
Posts (Atom)